Orthogonal projection
An overview article by Dorine in 't Veld published on https://handssee.eu/en/orthogonal_projection
Last revision 2025-12-11.
Summary: This article first describes what orthogonal projection means in the context of tactile images. It then provides a brief history of its introduction and spread in France and the Netherlands, including the instructional materials that were developed.
Contents
What is orthogonal projection?
In the context of tactile images, with 'orthogonal projection' we mean a method that:
- combines multiple orthogonal views
- enables blind and visually impaired readers/listeners to build a correct spatial mental representation of a 3D subject (thing, living being, (virtual) model, etc.)
- reveals which side of the object is facing you
- stimulates spatial thinking
- must be learned and practiced
What does orthogonal mean?
Orthogonal means: at a right angle. This keeps, unlike with perspective drawing, everything undistorted:
- lengths and proportions
- angles and curves
- shapes and proportions
This makes contours recognizable to the fingers. This is in contrast to perspective drawings, where everything is distorted.
What is projection?
A projection - in our context of tactile images - is a 2D representation of a 3D object. Like a photo. In other words: you define the contours of the object and of important protruding details on the surface.
This can be difficult to understand for someone who cannot see! Ways to explain this are:
- "Disappearing boards", inspired on the Transfograph of Hungry Fingers, where an object can be pushed through a hole that fits perfectly when the object is held in an orthogonal position. This is most understandable if, like in the Transfograph, a very small part remains protruding, allowing you to continue to feel "the view." This way, you (almost) experience the object becoming flat; the depth disappears.
- Tactile drawings, where the orthogonal view of the object fits perfectly.
- Dividing 3D objects into two halves. Especially with round objects, this helps to experience that, for example:
- the contour of a cylinder can be a circle on one (orthogonal) side and a rectangle on the other.
- that projections at a right angle show the widest part.
Especially when working with "holes," it is therefore important to clearly explain that the hole itself is not the projection, but a convenient way to determine the contour.
Spatial thinking
The crux of the matter is that you have to place the (usually three) views (in reality or in the mind) in their correct spatial orientation and "puzzle" them together:
- the top view: horizontal
- the front view: vertical straight towards you
- the side view: vertical, 90 degrees away from you or towards you
Working with orthogonal projection with multiple views stimulates spatial thinking!
Position in space
Note: The front view of an object is not necessarily the same as the front of that object. For example, if the side of a car is the front view, that side is facing you. This method also reveals the object's position in relation to you in space.
Learn and practice
This must be learned and practiced. But because the method perfectly matches how touch works, practice quickly makes perfect.
Origins in technical drawing
The origins of this application lie in technical drawing. Designers of 3D objects use orthogonal projection to create a very precise spatial drawing; a kind of virtual mould. It is therefore an international standard, although there are two different conventions:
- 'European projection': places the projection behind the object.
- 'American projection': places the projection in front of the object.
This can lead to confusion, which is why a mandatory symbol is used in technical drawing to clearly indicate which convention is being followed.
From 2D to 3D
For the application in tactile images, after the introduction we quickly abandon the basic representation with three views.
We can use the views more playfully and supplement them with other orthogonal views or sections. For example, above a floor plan, we can place the interior facade of a building, and below it, upside down, the opposite interior facade.
The experienced reader/listener* can now create a correct spatial representation of the interior based on this 2D drawing—and all without a 3D model.
(* By reader/listener we mean the reader of the tactile image with accompanying text or audio explanation).
Short history
Hoëlle Corvest
As early as the 1980s and 2000s, experiments and research were conducted on the use of orthogonal projection for tactile drawings. Hoëlle Corvest, blind and working at the Musée de Sciences in Paris as the person responsible for information for visually impaired visitors, was involved in this.
She became the leading proponent of this method, particularly in French-speaking regions.
Lego Kit (1998)
The first publication in which orthogonal projection was applied was the Lego Kit/ Kit Légo, Des dessins pour construire/constructing designs, published in 1998 by the Musée des Sciences in Paris (now Universcience).
The kit contains a set of Lego bricks, a tactile booklet with 'construction drawings,' and instructions on an audio cassette. It introduces and trains the method of orthogonal projection, where the reader must combine three views – orthogonal projections – in their mind to form a correct spatial mental representation of a 3D object. (For Lego bricks, 3 views are sufficient).
As Hoëlle told me, research showed that even children with visual and mild intellectual impairments could work with the method. Unfortunately, publications on this research are no longer available. (The Lego kit by the way is still available: from Les Doigts Qui Rêvent).
The photo shows:
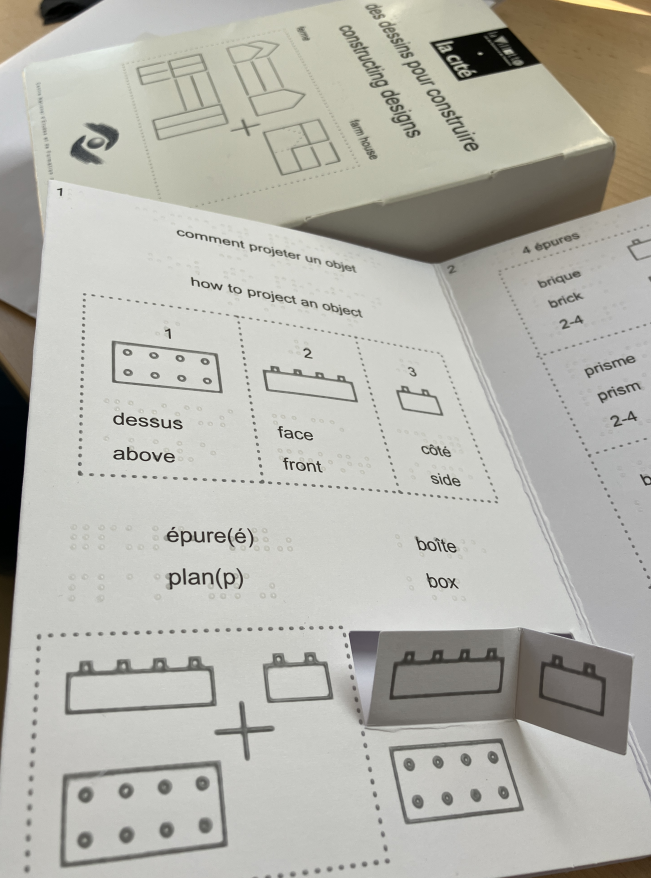
- the box that contains the Lego Kit
- the first page of the tactile book
The first page in the book shows three ways to arrange the views with the example of a lego brick with 8 studs.
(On top of the page):
A. From left to right
(At the bottom of the page):
B. Around a plus-sign
C. A foldable model
Explanation
A. From left to right
- Top view – from above (a horizontal rectangle with 8 studs)
- Front view – from the front (rectangle with the same width, with 4 studs on top)
- Side view – from the left – (narrow rectangle, same height as in front view; 2 studs on top)
B. Around a plus-sign
This follows the (European) standard for orthogonal projection in design. Each projection has another direction, or rather: position in space. Clockwise:
- Top view: bottom left quadrant.
- Front view: top left quadrant.
- Side view (from the left): top right quadrant The bottom right quadrant is left empty.
C. A foldable model
The plus is replaced by folding lines. This model shows the spatial positions of the ‘views’, or: how one should translate the views around the plus-sign spatially:
- Top view: lying down horizontally.
- Front view: standing upright behind it, bent towards the spectator.
- Side view (from the left): standing upright on the right, turned 90 degrees towards the spectator
The result is a half box, with a bottom plane, a backplane behind and a side plane on the right. When you put the lego brick on top of the ‘top view’ it is easy to understand the ‘projections’; each behind/on the other side of the object. The logic behind this is that if you project (with a projector/beamer) the projection is on the other side of the object. The object looses its ‘depth’ when projected; it is depicted flatly. In order to build a mental representation, this method requires an extra repositioning from the reader. He or she must move them (in the head): the top view to the top, the front view to the front and the (left) side view to the left.
Research
In the last 3 years of the previous millennium, a European project took place. The practical findings of it were summarized in the "Annexes", met:
- guidelines for the readability of tactile drawings on swell paper
- the introduction of orthogonal projection as a method for the tactile representation of three-dimensional subjects.
Implementation in France
Workshops (2000-now)
Hoëlle organised, in cooperation of the Musée des Sciences with the Louvre, workshops for blind adult people to learn to work with tactile images to give access to culture, art and science, based on the underlying principle of orthogonal projection.
In this presentation you find more information about the workshops, including pictures of examples and exercises with orthogonal projection. (Scroll to Part two to find examples of a cup, a mobile phone and a cardboard house.
In a slide with an example of a mannequin the same principle is used, but not the same display; the mannequin is shown standing from the side and from the front. In the two drawings on the left it stands upright; in position 3 and 4 one arm and one leg are raised.
Drawing and active manipulation
Participants are also invited to put the mannequin in otherpositions, and draw them.
In a part of a worskhops about facial expressions (to illustrate the theory of the art theorist Le Brun) cut-out shapes with mouths, eyes, eyebrows and noses were supplied on magnetic foil in order to allow the participants to 'draw' facial expressions.
This active participation (embodied learning we would say now) is very important for learning and remembering.
Understanding the transition 3D-2D and back
Important: in the learning phase objects are used that
- fit in the hands
- are known to participants This allows understanding the relation between the 3D-object and its (flat) projections.
In the workshops the method was well received. In Education orthogonal projection was not implemented very much. This situation exists to this day.
Implementation in The Netherlands
Explore your world (2011-2013)
Orthogonal projection was first introduced for children in primary school in project ‘Verken je wereld’ (Explore your world (by touch)), 2011-2013. You can find (swell paper)examples at: Eduvip
Then implementation hampered. There were several projects however that stressed the need of concept-building in blind and partially sighted children. Many things cannot be touched, so how is the child to know and understand them? Description alone often leaves much to guess; how is the bird swimming? And the fish? And the child? 3D-models are not a panacee and interest in using tactile images for concept building grew. Tactile drawings are conversational pieces; for example, a child might only feel two legs in a picture of a cow; how does that work? Or they might feel the hairs around an eye and discover that they also have eyelashes.
Op de Tast (2017-now)
From 2017-2019 there was the project Op de Tast (By Touch). Here tactile images were developed to explain
concepts that were not explained in school books, since they are 'obvious' for sighted childern. Among them:
visual concepts. And a way to explain very precisely 3D-subjects. They were adopted in a sub-series:
Op de tast... : Van 3D naar 2D –
- Op de tast...: Van 3D naar 2D: Basis
- Op de tast...: Van 3D naar 2D: De dingen om ons heen
- Op de tast...: Van 3D naar 2D: Lego
All tactile books come with separate texts with explanation. The physical books and the braille or digital texts can only be ordered (for free) by students that are registered (as ‘blind’) with Dedicon.
Part 1, the basic book, stresses that the method also reveals the position in space of the object that is depicted. The spectator knows which side is turned towards him/her and how the subject/object is spatially organized.
Part 2, ‘Things around us’, introduces ever bigger objects.
Part 3, ‘Lego’, introduces ‘occlusion’ and has a strong emphasis on ‘from which side’?
Though here we strictly speaking we leave orthogonal projection, I would like to mention here:
Once orthogonal projection is understood - and spatial thinking is better developed - it is better possible to explain shadow and perspective. BTW: In the workshops in France perspective is also explained.
The principle of orthogonal projection was used in many of the Op de tast…-books.
For adults (2019-now)
- In 2019 two courses for adult readers were developed. These cannot be viewed or downloaded. The course is used for self-study, but from time to time workshops are organized.
- Orthogonal projection hence was used in publications for adults:
- thematic books (tactile + text)
- a two-montly subscription for a tactile image + explanation of a current issue.
All these publications enjoy an ever-growing readership.
Reactions from participants in the workshops where the principle of working with several orthogonal views was explained were positive. At first it was difficult for people who had never done this but soon they got the hang of it and would say things like ‘I should have learned this in primary school, then I would have been better at mathematics!'.
Learning Path 3D-2D (2019-2022)
In the project Leerweg 3D-2D Visio and Bartiméus Education fot the VI developed a 'Learning Path' (for the youngest readers up to secondary school students). It doesn't use the term orthogonal projection, but it does use its principle. In the Learning Path 3D-2D 'disappearing boards' were introduced (see the chapter 'What is projection'?).
Tacticos (2023-2025)
In the Tacticos project (2023-2025), the method of working with orthogonal projection as described in the Lego Kit frequently proved confusing for the participating teachers. They also felt it might be too complicated for children.
And of course combining differend orthogonal views is too difficult for young children, lacking the motor and cognitive skills required. But for children who have developed this skills, it is an important gain to learn to work with orthogonal projection.
Roundy
Two example books have been created for the Tacticos project. The example book "Roundy," for children 9-10 years old, explains and uses orthogonal projection. The explanation uses a 3D rocket and tactile drawings of its top, front, and side views. The photo in the next chapter illustrates this.
A half-box has been placed on the top view with cutouts through which the rocket, while holding it in the same position, can be slid (straight down, straight from front to back, and from left to right — and vice versa).
Tip: The tactile drawings and texts can be downloaded at https://tacticos.eu/books/roundy-book/. The texts are available in English, French, and Dutch.
A more intuitive scheme
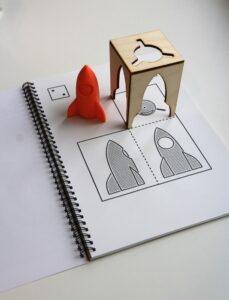 Without abandoning the principles, in Tacticos the representation was made more intuitive to
make it meet the needs for Education.
Without abandoning the principles, in Tacticos the representation was made more intuitive to
make it meet the needs for Education.
Views or projections?
Maybe we should discuss 'views' and 'projections'... Instead of putting the projections behind the object, in Tacticos we put the views in front of the object. As if (orthogonal) 'photos' of each orthogonal view are fixed on the corresponding side of a cube or brick around the object.
In the diagram this means:
- Top view upper right quadrant
- Front view under the top view
- Side view (from the left) to the left of the top view.
Hand Movements
In addition to the more intuitive model I added in instructions explicitly the use of hand movements (from above, from the front, from the side), as is illustrated in this 26 seconds instruction video.
Embodied Learning
I also added to the instrucion to actually use scissors to cut away the unused quadrant and fold the remaining quadrants into their correct spatial position to (physically) experience the change of direction and interrelationship of the views.
This helped a lot as I found in workshops I gave just before leaving Dedicon.
The new display can be found in Roundy, the example book that shows how 3D- objects and concepts can be explained with the help of tactile images.
The image book and English texts are downloadable! https://tacticos.eu/books/roundy-book/.
The present situation
In The Netherlands we have several ways to teach orthogonal projection, using one view or more, for different needs and ages. In France orthogonal projection combining several views seems not to have been embraced on a wide scale in education, orthogonal contours however are commonly used.
The future
What's needed to elevate the use of tactile images is:
- Raising awareness and promoting the benefits and possibilities among all involved, as this is often lacking.
- Raising awareness and training for older people who have never learned to work with tactile images.
International cooperation:
- International exchange of materials and teaching methods
- Reflection on existing and new tactile images
- More uniformity in:
- Drawing and describing methods
- Terminology and definitions (perhaps we should talk about 'views' and 'projections'...)
- More comprehensible tactile images (with the necessary explanations) and books that
- Are pleasant to touch and read
- Are affordable
- Easy to find and obtain
International cooperation is important to reach these goals, because:
- It concerns a relatively small target group with a global spread.
- Highly specialized knowledge is required.
- Developing tactile materials is expensive, and by scaling up, we can reduce development and reproduction costs, making more high-quality products available.